HelloWorld, Deploy to CDN
The SharePoint Framework is currently in Preview, and is subject to change based on customer feedback. While we’re in preview, SharePoint Framework web parts are not supported for use in production environments.
In this tutorial, we will deploy the HelloWorld assets to a remote CDN instead of using the local environment. We will use an Azure Storage account integrated with CDN to deploy our assets. SharePoint Framework build tools provide out of the box support for deploying to Azure Storage account. However, you can manually upload the files to your favourite CDN provider or SharePoint as well.
As a pre-requisite, you should have completed the following tutorials before you start this tutorial:
- Tutorial 1 - HelloWorld Web Part
- Tutorial 2 - HelloWorld, Talking to SharePoint
- Tutorial 3 - HelloWorld, Serving in Classic SharePoint Page
Each step below will build on the previous so you will need to go through each step one by one to successfully complete this lab.
For this tutorial, you will need to first configure an Azure Storage account and integrate with CDN.
You can follow the instructions here on how to create a Storage account and integrate with CDN.
Once you have successfully setup the Storage account, you will need the following information to complete this tutorials:
- Storage account name
- BLOB Container name
- Storage account access key
Switch to console and make sure you are still in the project directory used in Tutorial 1, 2 and 3.
If you still have gulp serve running, terminate the task by pressing Ctrl+C
Else, navigate to your project directory:
cd helloworld-webpart
Switch to Visual Studio Code and navigate to HelloWorld web part project.
Open deploy-azure-storage.json in the config folder.
This is the file that contains your Azure Storage account details.
{
  "workingDir": "./temp/deploy/",
  "account": "<!-- STORAGE ACCOUNT NAME -->",
  "container": "helloworld-webpart",
  "accessKey": "<!-- ACCESS KEY -->"
}
Replace the account, container, accessKey with your storage account name, BLOB container and storage account access key respectively.
workingDir is the directory where the web part assets will be located.
Save the file.
Before uploading the assets to CDN, we first need to build them.
Switch to the console and execute the following gulp task:
gulp --ship
This will build the minified assets required to upload to the CDN provider. The --ship indicates the build tool to build for distribution. You should also notice the output of the build tools indicate the Build Target is SHIP.
Build target: SHIP
[21:23:01] Using gulpfile ~/apps/helloworld-webpart/gulpfile.js
[21:23:01] Starting gulp
[21:23:01] Starting 'default'...
The minified assets can be found under the tmp\deploy directory.
Switch to the console of the HelloWorld project directory.
Type the gulp task to deploy the assets to your storage account:
gulp deploy-azure-storage
This will deploy the web part bundle along with other assets like JavaScript, CSS files etc., to CDN.
In order for the web part to load from your CDN, you will need to tell it your CDN path.
Switch to Visual Studio Code and open the write-manifests.json from the config folder.
Type your CDN base path for the cdnBasePath property.
{
  "cdnBasePath": "<!-- PATH TO CDN -->"
}
Save the file.
Since we have changed the web part bundle, we will need to re-deploy the package to the App Catalog. We used --ship to generate minified assets for distribution.
Switch to the console of the HelloWorld project directory.
Type the gulp task to package the client-side solution. This time with the --ship flag to indiciate to pick uo the CDN base path configured in the previous step:
gulp package-solution --ship
This will create the updated client-side solution package in the sharepoint\solution folder.
Upload or drag & drop the client-side solution package to the App Catalog.
Since we already had deployed the package, you will be prompted asking whether to replace the existing package.
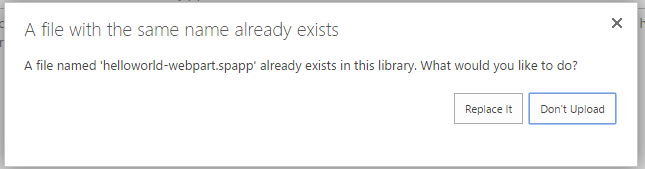
Click Replace It.
App Catalog will now have the latest client-side solution package where the web part bundle is loaded from the CDN.
This will update all the instances of our HelloWorld web part in SharePoint to now fetch the resources from CDN.
Navigate to the HelloWorld web part page we created in the previous tutorial:
Your HelloWorld web part will now load the web part bundle and other assets from CDN.
Notice you are no longer running gulp serve and hence nothing served from localhost.
In order to deploy the assets to your favorite CDN provider, you can copy the files fromtmp\deploy folder. To generate assets for distribution you will run the following gulp command as we did before with the --ship parameter:
gulp --ship
In the next tutorial, we will see how to load jQuery, jQuery UI and build a jQuery Accordion WebPart.