jQueryUI Accordion WebPart
The SharePoint Framework is currently in Preview, and is subject to change based on customer feedback. While we’re in preview, SharePoint Framework web parts are not supported for use in production environments.
In this tutorial, lets add the jQueryUI Accordion to our web part project. We will build on top of the skills from previous tutorials, but will create a new web part for it.
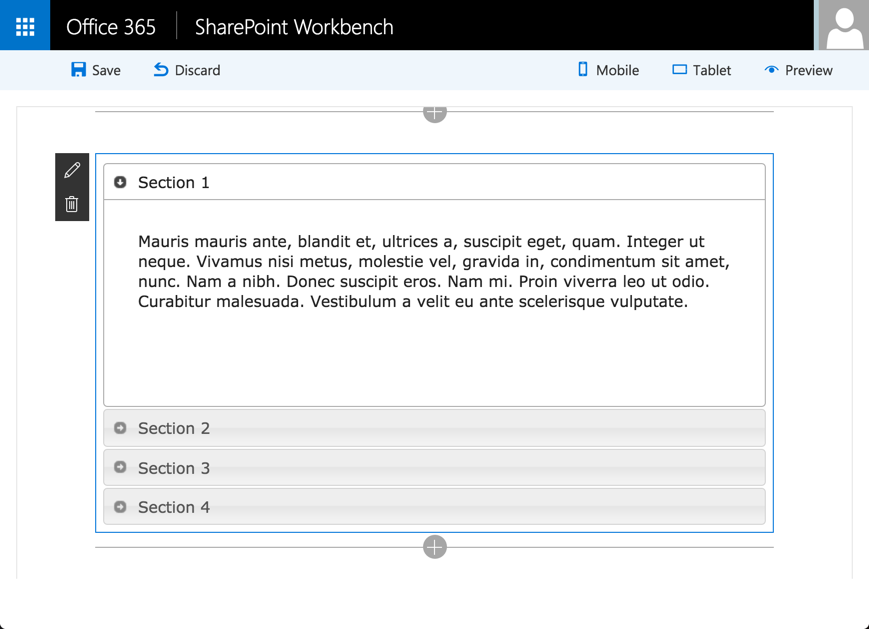
The completed web part will look like this:
As a pre-requisite, you should have completed the following tutorials before you start this tutorial:
As explained in the Tutorial 1, the developer toolchain uses Webpack, SystemJS and CommonJS to bundle your web parts. This also includes loading any external dependencies you have such as jQuery, jQueryUI etc., To load such external dependencies, at a high level, you will need to:
- Acquire the external library, either via npm or download from the vendor
- If available, install the respective framework's TypeScript type definitions
- If required, update your solution config to not include the external dependency in your web part bundle by default
Lets now go build the jQueryUI Accordion in our web part.
Each step below will build on the previous so you will need to go through each step one by one to successfully complete this lab.
Create a new project directory in your favorite ___location:
md jquery-webpart
Warning! Make sure to create this directory in a new folder, not as a subdirectory of
helloworld-webpart.
Navigate to the project directory:
cd jquery-webpart
Create a new jQuery webpart by running the Yeoman SharePoint Generator:
yo @microsoft/sharepoint
You will be prompted with a series of questions:
- Accept the default
jquery-webpartas your solution name and pressEnter. - Select "Use the current folder" to place the files.
The next set of prompts will ask specific information about your web part:
- Type
jQueryfor the web part name and pressEnter. - Enter
jQuery Web Partas the description of the web part and pressEnter. - Accept the default
No javascript web frameworkoption for the framework and pressEnterto continue. - In the next prompt, press
Enterto continue. We will not select any libraries to add in this tutorial.
At this point, yeoman will install the required dependencies and scaffold the solution files. This might take a few minutes. Yeoman will scaffold the project to include your jQueryWebPart web part as well.
In the console, type the following to open the web part project in Visual Studio Code:
code .
In the console, type the following to install jQuery npm package:
npm i --save jquery
Now type the following to install jQueryUI npm package:
npm i --save jqueryui
TypeScript Definition Manager (TSD) allows you to search and install type definitions for your project. Using TSD we can install the type definitions for jQuery and jQuery UI.
As the web part project is primarily a TypeScript project, it is essential the TypeScript compiler is able to understand the respective types. It also helps to provide the intellisense required in the code editor.
To do, first install TypeScript definition manager
Open your console and execute the commands:
npm i -g tsd
Now install jQuery and jQuery UI type definitions:
tsd install jquery jqueryui --save
TSD will install the type definitions into the /typings folder, where there are few other typings already available which was scaffolded by the Yeoman generator.
Navigate to /typings/jquery and /typings/jqueryui to find the type definitions for jQuery and jQuery UI respectively.
For drop 1, there is a workaround needed when loading css files (later on in this tutorial we will show you how). For now, you need to include one other typing
tsd install combokeys --save
By default any dependencies you add gets bundled into the web part bundle. While this could be true for some cases, it is not ideal. Hence you can choose to unbundle these dependencies from the web part bundle.
In Visual Studio Code, open the file config\config.json
This config.json contains information about your bundle(s) and any external dependencies included.
The entries region contains the default bundle information which in our case is the jQuery web part bundle. You will see one entry per web part once you add more web parts to your solution.
"entries": [
  {
    "entry": "./lib/webparts/jQuery/jQueryWebPart.js",
    "manifest": "./src/webparts/jQuery/jQueryWebPart.manifest.json",
    "outputPath": "./dist/j-query.bundle.js",
  }
]
The externals section contains the libraries information that are not bundled with the default bundle. As you can see, we have a few by default.
  "externals": {
    "@microsoft/sp-client-base": "node_modules/@microsoft/sp-client-base/dist/sp-client-base.js",
    "@microsoft/sp-client-preview": "node_modules/@microsoft/sp-client-preview/dist/sp-client-preview.js",
    "@microsoft/sp-lodash-subset": "node_modules/@microsoft/sp-lodash-subset/dist/sp-lodash-subset.js",
    "office-ui-fabric-react": "node_modules/office-ui-fabric-react/dist/office-ui-fabric-react.js",
    "react": "node_modules/react/dist/react.min.js",
    "react-dom": "node_modules/react-dom/dist/react-dom.min.js",
    "react-dom/server": "node_modules/react-dom/dist/react-dom-server.min.js"
  },
In order to exclude jQuery and jQueryUI from the default bundle, we add the modules respectively to the externals section:
"jquery":"node_modules/jquery/dist/jquery.min.js",
"jqueryui":"node_modules/jqueryui/jquery-ui.min.js"
Now when you build your project, jQuery and jQueryUI will not be bundled into your default web part bundle
Now that we have defined our external dependencies, it is time we build the accordion.
Switch to Visual Studio Code. Your project should have the jQuery web part that we added in the steps above under the /src/webparts/jQuery folder.
If you do not have the project open, open the project folder jquery-webpart in Visual Studio Code.
Add a new file under the /src/webparts/jQuery folder called MyAccordionTemplate.ts
Create and export (as a module) a class MyAccordionTemplate that holds the HTML code for the accordion.
export default class MyAccordionTemplate {
    public static templateHtml: string =  `
      <div class="accordion">
        <h3>Section 1</h3>
        <div>
            <p>
            Mauris mauris ante, blandit et, ultrices a, suscipit eget, quam. Integer
            ut neque. Vivamus nisi metus, molestie vel, gravida in, condimentum sit
            amet, nunc. Nam a nibh. Donec suscipit eros. Nam mi. Proin viverra leo ut
            odio. Curabitur malesuada. Vestibulum a velit eu ante scelerisque vulputate.
            </p>
        </div>
        <h3>Section 2</h3>
        <div>
            <p>
            Sed non urna. Donec et ante. Phasellus eu ligula. Vestibulum sit amet
            purus. Vivamus hendrerit, dolor at aliquet laoreet, mauris turpis porttitor
            velit, faucibus interdum tellus libero ac justo. Vivamus non quam. In
            suscipit faucibus urna.
            </p>
        </div>
        <h3>Section 3</h3>
        <div>
            <p>
            Nam enim risus, molestie et, porta ac, aliquam ac, risus. Quisque lobortis.
            Phasellus pellentesque purus in massa. Aenean in pede. Phasellus ac libero
            ac tellus pellentesque semper. Sed ac felis. Sed commodo, magna quis
            lacinia ornare, quam ante aliquam nisi, eu iaculis leo purus venenatis dui.
            </p>
            <ul>
            <li>List item one</li>
            <li>List item two</li>
            <li>List item three</li>
            </ul>
        </div>
        <h3>Section 4</h3>
        <div>
            <p>
            Cras dictum. Pellentesque habitant morbi tristique senectus et netus
            et malesuada fames ac turpis egestas. Vestibulum ante ipsum primis in
            faucibus orci luctus et ultrices posuere cubilia Curae; Aenean lacinia
            mauris vel est.
            </p>
            <p>
            Suspendisse eu nisl. Nullam ut libero. Integer dignissim consequat lectus.
            Class aptent taciti sociosqu ad litora torquent per conubia nostra, per
            inceptos himenaeos.
            </p>
        </div>
     </div>`;
}
Save the file.
As we have declared our accordion HTML in a TypeScript class module, it is also necessary to import that module:
Switch to Visual Studio code and open src\webparts\jQuery\JQueryWebPart.ts
At the top of the file, where you can find other imports, add the following import:
import MyAccordionTemplate from './MyAccordionTemplate';As we have already have jQuery installed as npm modules, we can directly import them in our web part just like we imported MyAccordionTemplate.
At the top of the file, where you can find other imports, add the following import:
import * as myjQuery from 'jquery';
Notice how we are importing the jQuery module into a custom variable name myjQuery. You can call it whatever you want to assign the jQuery module into. Preferably something that is related to your web part is always recommended.
As jQuery UI is a plugin, we will load it via a require statement instead of import:
Just below the jQuery import, add the following require:
require('jqueryui');Next, we'll be loading some external css files. To do that we need to use the module loader. Add the following import
import importableModuleLoader from '@microsoft/sp-module-loader';To load the jQuery UI styles, in the JQueryWebPart web part class, add the following line inside the constructor:
importableModuleLoader.loadCss('//code.jquery.com/ui/1.11.4/themes/smoothness/jquery-ui.css');The constructor should look like this now:
public constructor(context: IWebPartContext){
    super(context);

    importableModuleLoader.loadCss('//code.jquery.com/ui/1.11.4/themes/smoothness/jquery-ui.css');
}
The code above:
- Calls the parent constructor with the context to initialize the webpart
- Loads the accordion styles from a CDN asynchronously
In the jQueryWebPart.ts, navigate to the render method.
Set the web part's inner HTML to render the accordion HTML:
this.domElement.innerHTML = MyAccordionTemplate.templateHtml;jQueryUI Accordion has few options that you can set to customize the accordion. Lets define few options for our accordion just below this.domElement.innerHTML = MyAccordionTemplate.templateHtml;:
const accordionOptions: JQueryUI.AccordionOptions = {
  animate: true,
  collapsible: false,
  icons: {
    header: 'ui-icon-circle-arrow-e',
    activeHeader: 'ui-icon-circle-arrow-s'
  }
};
As you can see jQueryUI typed definition allows us to create a typed variable called JQueryUI.AccordionOptions and specify the supported properties.
Play around with the intellisense and you will notice you will get full support for available methods under JQueryUI. as well as the method parameters.
Finally, initialize the accordion:
myjQuery(this.domElement).children('.accordion').accordion(accordionOptions);As you can see, we use the variable myjQuery we used to import jquery module earlier. We then initialize the accordion.
Here is the complete render method class looks like after changes above:
public render(): void {
  this.domElement.innerHTML = MyAccordionTemplate.templateHtml;

  const accordionOptions: JQueryUI.AccordionOptions = {
    animate: true,
    collapsible: false,
    icons: {
      header: 'ui-icon-circle-arrow-e',
      activeHeader: 'ui-icon-circle-arrow-s'
    }
  };

  myjQuery(this.domElement).children('.accordion').accordion(accordionOptions);
}
Save the file.
Switch to your console, make sure you are still in the jquery-webpart folder and type the following to build and preview your web part:
gulp serve
Visual Studio Code provides built-in support for gulp and other task runners. You can press Ctrl+Shift+B if you are in Windows or Cmd+Shift+B if you are in Mac within Visual Studio Code to debug and preview your web part.
Gulp will execute the tasks and open the local SharePoint Web Part Workbench.
In the page canvas, click the + to reveal the list of web parts available.
You should see the jQuery web part.
Add the jQuery web part.
You should see the jQueryUI Accordion now!
Switch to the console where you have gulp serve running and terminate the task by pressing Ctrl+C
This concludes our tutorial. In this tutorial, we saw how to define, load and unbundle external dependencies and successfully built a jQueryUI accordion web part.
In the next tutorial, we will use Office UI Fabric in our client web part.